Showing posts with label TKJ Level 3. Show all posts

Thursday, November 17, 2011

The Warriors of The Net


Kita pasti sering menggunakan fasilitas "Internet" pada kehidupan kita sehari-hari, dengan melalui handphone, tablet, ataupun PC. Baik untuk mencari sebuah berita, mendengarkan musik, dan menonton video secara streaming.

Tapi tahukah anda bagaimana sebuah teknologi dapat bekerja melayani permintaan anda? Tahukah anda betapa sibuknya jaringan data di dunia ini untuk melayani client? Dan siapakah penjaga dan pengatur lalu lintas data yang sangat banyak tersebut hingga sampai di komputer anda dengan selamat?

Berikut sebuah video, yang menggambarkan betapa sibuknya jaringan data pada seluruh dunia untuk menangani client-clientnya, dan juga terdapat ilustrasi mengenai peranan Router, DNS Server, Firewall, dll yang mengatur lalu lintas data.

Let's see how the computer networking in this world can work....


[The History]

Manuscript - Tomas Stephanson, Monte Reid

For the first time in history people and machinery are working together, realizing a dream. A uniting force that knows no geographical boundaries. Without regard to race, creed or color. A new era where communication truly brings people together.

This is the Dawn of The Net.

Want to know how it works? Click here to begin your journey into the Net.

Now exactly what happened when you clicked on that link? You started a flow of information. This information travels down to your own personal mail-room where Mr. IP packages it, labels it and sends it on its way. Each packet is limited in its size. The mail-room must decide how to divide the information and how to package it.

Packet gets addressed The IP packet now needs a label, containing important information such as senders address, receivers address and the type of packet it is. Because this particular packet is going out onto the Internet, it also gets an address for the Proxy Server which has a special function as we'll see later.

The packet is now launched onto your Local Area Network or LAN. This network is used to connect all the local computers, routers, printers etc. for information exchange within the physical walls of the building. The LAN is a pretty uncontrolled place and unfortunately accidents can happen.

The packet is launched onto the LAN The highway of the LAN is packed with all types of information. There are IP packets, Novell packets, Apple Talk packets - Uh, they're going against traffic as usual. The local router reads the address and if necessary lifts the packet onto another network.

The Router lifts packets from the LAN Ah the router. A symbol of control in a seemingly disorganized world. There he is..systematic, uncaring, methodical, conservative and sometimes not quite up to speed. But he is exact... for the most part.

The Router Switch As the packets leave the router, they make their way into the corporate intranet and head for the router switch. A bit more efficient than the router, the router switch plays fast and loose with IP packets deftly routing them along their way. A digital pin-ball wizard if you will.

< As packets arrive at their destination they are picked up by the network interface, ready to be sent to the next level. In this case, the proxy. The proxy is used by many companies as a sort of "middleman" in order to lessen the load on their Internet connection. And for security reasons as well. We can see that the packet are all of various sizes, depending on their content.

The proxy opens the packet and looks for the WEB address or URL. Depending upon whether the address is acceptable…the packet is sent on to the Internet. There are, however, some addresses which do not meet with the approval of the proxy (that is to say corporate or management guidelines). These are summarily dealt with. We'll have none of that. For those who make it, it's on the road again.

Will the packet pass the fire wall? Next up - the Fire Wall. The corporate Fire Wall serves two purposes. It prevents some rather nasty things from the Internet from coming into the intranet. And it also can prevent sensitive corporate information from being sent out to the Internet.

Once through the fire wall, a router picks up the packet and places it on to a much narrower road or band-width, as we say. Obviously, the road is not broad enough to take them all.

Now you might wonder what happens to all those packets which don't make it along the way. Well, when Mr. IP doesn't receive an acknowledgment that a packet has been received in due time, he simply sends a replacement packet.

The traffic on the Internet We are now ready to enter the world of the Internet. A spider web of inter-connected networks which spans our entire globe. Here, routers and switches establish links between networks.

Now, the Net is an entirely different environment than you'll find within the protected walls of your LAN. Out here, it's the Wild West. Plenty of space, plenty of opportunities, plenty of things to explore and places to go. Thanks to very little control and regulation new ideas find fertile soil to push the envelope of their possibilities. But because of this freedom, certain dangers also lurk. You'll never know when you'll meet the dreaded Ping Of Death. A special version of a normal request Ping which some idiot thought up to mess up unsuspecting hosts.

The paths our packets take maybe via satellite, telephone lines, wireless or even trans-oceanic cable. They don't always take the fastest or shortest routes possible, but they probably will get there - eventually. Maybe that's why it's sometimes known as the World Wide Wait. But when everything is working smoothly, you can circumvent the globe 5 times over, at the drop of a hat - literally. And all for the cost of a local call or less.

Near the end of our destination, we'll find another Fire Wall. Depending upon your perspective as a data packet, the fire wall can be a bastion of security or a dreaded adversary. It all depends on which side your on and what your intentions are.

The Fire Wall is designed to let in only those packets that meet its criteria. This wall is operating on ports 80 and 25. All attempts to enter through other ports are closed for business.

Port 25 is used for mail packets, while port 80 is the entrance for packets from the Internet to the Web server.

Inside the fire wall, packets are screened more thoroughly, some packets make easily through "customs" while others look just a bit dubious. The Fire Wall officer is not easily fooled, such as when this ping of death packet tried to disguise itself as a "normal" ping packet.

Entering the network interface For those packets lucky enough to make this far, the journey is almost over. It's just to line up on the interface to be taken up into the web server.

Nowadays, a web server can run on many things. From a mainframe, to a web-cam to the computer on your desk. Or why not your refrigerator? With the proper set-up, you can find out if you the makings for Chicken Catchitory or if you have to go shopping. Remember this is the Dawn of the Net - almost anything's possible.

The returning packet is filled with information One by one, the packets are received, opened and unpacked. The information they contained, that is your request for information is sent onto the Web server application. The packet itself is recycled. Ready to be used again. And filled with your requested information. Addressed and sent out on its way back to you.

Back past the fire walls, routers, and on through the Internet. Back through your corporate fire wall and onto your interface.

Ready to supply your web browser with the information you requested.

That is all..

Thursday, May 12, 2011

Membuat Proxy Server berbasis Debian 5 (Lenny) sebagai Content Filter


Jenis aplikasi yang berfungsi untuk mem-blokir informasi yang datang dari internet di kenal dengan istilah Content Filter. Dengan aplikasi ini maka kita bisa menyaring informasi tertentu seperti pornografi, hacking, kekerasan dll yang tidak pantas muncul di browser client. Software yang bisa kita gunakan untuk membangun content filter diantaranya squid. Mari kita coba bersama bagaimana membangun proxy server sebagai content filter.

1. Pertama kita harus men-setting router dahulu. Untuk setting router dan IP nya dapat dilihat DI SINI.

2. Kemudian kita install paket-paket yang diperlukan yaitu squid.
Perintahnya :
D4V1D:~# apt-get install squid

3. Lalu remove / hapus pengaturan squid dasar, sebab kita akan membuat pengaturan dan rule yang baru.
D4V1D:~# rm /etc/squid/squid.conf

4. Setelah di hapus, buat squid.conf yang baru.
Perintahnya :
D4V1D:~# nano /etc/squid/squid.conf
Lalu isi squid.conf ini dengan script di bawah ini.
acl all src all
acl localnet src 192.168.1.0/26
acl situs url_regex -i "/etc/squid/blokir.txt"
http_access deny situs
http_access allow localnet
http_access allow all
http_port 3128 transparent
cache_mem 8 mb
memory_replacement_policy heap GDSF
cache_replacement_policy heap LFUDA
store_dir_select_algorithm round-robin
cache_dir aufs /cache 10000 24 256
cache_store_log none
cache_access_log /var/log/squid/access.log
cache_effective_user proxy
cache_effective_group proxy
visible_hostname proxy.bloganakkomputer.blogspot.com

Screenshoot squid.conf
keterangan :
Pada “acl localnet src 192.168.1.0/26” dapat disesuaikan dengan pengaturan IP anda yaitu ip yang anda gunakan pada eth1 dan merupakan gateway client. 

5. Buat list situs yang akan di blokir.
D4V1D:~# nano /etc/squid/blokir.txt
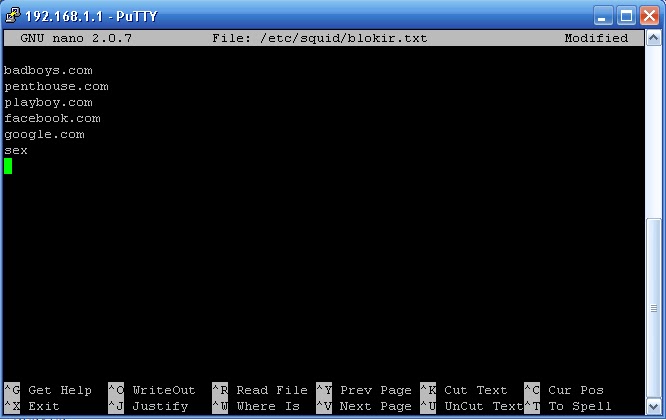
Isi dengan website atau kata kunci yang akan di blokir, sebagai contoh list di bawah.


blokir.txt


6. Buat cache.
D4V1D:~# mkdir /cache

7. Lalu ketik perintah di bawah ini secara urut untuk membuat Swap Directories.
D4V1D:~# chown –R proxy:proxy /etc/squid/blokir.txt
D4V1D:~# chown –R proxy:proxy /cache
D4V1D:~# /etc/init.d/squid stop
D4V1D:~# squid –z

8. Start squidnya
D4V1D:~# /etc/init.d/squid start

9. Edit file rc.local.
D4V1D:~# nano /etc/rc.local

Lalu masukkan iptables di bawah ini sebelum #exit 0
iptables -A PREROUTING -t nat -p tcp --dport 80 -j REDIRECT --to-port 3128

Screenshoot rc.local

10. Terakhir, restart squidnya lagi.
D4V1D:~# /etc/init.d/squid restart

Pengujian

Untuk menguji content filter kita apakah sudah berhasil atau belum kita jalankan aplikasi Mozila Firefox. Sebelumnya kita perlu setting dahulu proxy nya. Ini cara settingnya…

1. Pilih Tools – Option

2. Kemudian pilih tab Advanced - Network, pilih Settings
Pada halaman Connection Settings, pilih Manual proxy configuration dan setting supaya menggunakan HTTP proxy 192.168.1.1 dan pada port 3128 (seperti gambar di bawah).


3. Nah sekarang kita coba ketik salah satu url yg telah kita setting pada blokir.txt di atas. Kita masukkan facebook.com pada address bar.


4. Jika hasilnya seperti pada gambar di atas, maka content filter kita sudah bekerja dengan baik dengan memblok situs facebook.com. Dapat juga kita coba dengan situs-situs yang telah kita masukkan.

Ok, teman-teman sekian dahulu sedikit ilmu dari saya (dari hasil browsing dan googling, hehe...) tentang Membuat Proxy Server berbasis Debian 5 (Lenny) sebagai Content Filter.
Semoga bermanfaat kawan.

D4V1D

Tuesday, May 10, 2011

Membuat Proxy Server berbasis Debian 5 (Lenny) sebagai Autentikasi User


Dengan squid memungkinkan kita untuk membuat pembatasan koneksi melalui autentikasi. Dengan autentikasi maka user dipaksa harus memasukkan username dan password. Bila username dan password tersebut cocok dan terdaftar dalam database squid maka user tersebut diperbolehkan terkoneksi ke internet. Nah, pada tutorial kali ini saya ingin membahas sedikit tentang membuat proxy server berbasis Debian Lenny yang digunakan untuk autentikasi user sederhana. Bagaimana cara membangunnya? Mari kita coba bersama…

a. Pertama kita harus men-setting router dahulu. Untuk setting router dan IP nya dapat dilihat DI SINI.

b. Sebelum kita mengkonfigurasi autentikasi user mode ncsa dengan squid kita install dulu paket-paket yang dibutuhkan yaitu squid dan apache2. Kita install kedua paket tersebut dengan perintah :

D4V1D:~# apt-get install squid apache2

c. Ketikkan perintah di bawah ini secara urut.

D4V1D:~# touch /etc/squid/squid_passwd
D4V1D:~# chmod o+r /etc/squid/squid_passwd
D4V1D:~# htpasswd /etc/squid/squidpasswd david
(masukkan password baru)
(masukkan ulang password baru)


Screenshoot

Gunakan program htpasswd untuk menambahkan user ke file password. Anda bisa menambahkan setiap user setiap saat tanpa harus merestart Squid. Dalam hal ini, anda menambahkan satu username david.

d. Konfigurasi file squid.conf
Pada file squid.conf ada 2 konfigurasi utama yaitu meng-enablekan ncsa_auth dan konfigurasi acl serta http_access.
perintah :
D4V1D:~# nano /etc/squid/squid.conf


Hilangkan tanda “#” pada baris yang di dalam kotak. Pada bagian akhir kita ubah menjadi “/etc/squid/squid_passwd” (lihat gambar di atas).

Lalu tambahkan script seperti yang saya beri tanda kotak (seperti gambar di atas). Kita buat acl (access control list) dan http_access untuk mengatur apakah user diijinkan untuk melakukan autentikasi. Pada intinya hanya seperti itu.

Setelah semua konfigurasi selesai kita restart squid dengan perintah
D4V1D:~# /etc/init.d/squid restart

Pengujian

Untuk menguji autentikasi user kita apakah sudah berhasil atau belum kita jalankan aplikasi Mozila Firefox. Sebelumnya kita perlu setting dahulu proxy nya. Ini cara settingnya…

1.    1. Pilih Tools – Option

2.    2. Kemudian pilih tab Advanced - Network, pilih Settings
     Pada halaman Connection Settings, pilih Manual proxy configuration dan setting seperti gambar di bawah


3.    3. Sekarang kita coba ketik google.com pada address bar  dan hasilnya seperti di bawah ini


     Kita akan diminta memasukkan username dan password untuk dapat browsing.

4.    4. Nah kita masukkan nama user dan kata sandi nya seperti yang telah kita buat di atas. Kebetulan nama user saya “david” dan kata sandinya “123”. Setelah kita memasukkan nama user dan kata sandi squid akan meredirect to google.com.. Kemudian langsung browsing aja deh.

Ok, teman-temanku sebangsa dan setanah air sekian dahulu sedikit ilmu dari saya (sebenarnya dari hasil browsing dan googling, hehehe) tentang Membuat Proxy Server berbasis Debian 5 (Lenny) sebagai Autentikasi User.
Semoga berguna ya.
D4V1D

Membangun DHCP Server pada Debian 5 (Lenny)


DHCP (Dynamic Host Configuration Protocol) adalah sebuah mekanisme yang memunkinkan sebuah server untuk memberikan IP Address secara dinamik bagi client. Client melakukan permintaan IP Address kepada server, dan server memberikan alokasi bagi si client tersebut. Mekanisme ini akan sangat memberikan keuntungan bagi manajemen jaringan di karenakan proses setting IP Address tidak harus dilakukan manual untuk setiap client yang ada.

1. Instalasi

Software yang diperlukan untuk membuah sebuah service DHCP adalah dhcp3-server. Untuk melakukan instalasi dhcp3-server lakukan perintah:
D4V1D:~# mount /dev/dvd /cdrom  (berfungsi untuk mengenalkan cd installernya / proses mounting)
D4V1D:~# apt-get  install dhcp3-server  (untuk proses instalasi)

2. Konfigurasi

File konfigurasi dhcp3-server terletak di file /etc/dhcp3/dhcpd.conf. Gunakan editor nano untuk melakukan editing terhadap file konfigurasi tersebut. Sebelum melakukan konfigurasi DHCP Server, beberapa hal harus kita perhatikan diantaranya:

1. Alokasi IP Address yang akan diberikan kepada client harus berada satu network dengan IP Address server
2. Tentukan rentang IP Address yang akan diberikan kepada client tersebut
3. Alokasi IP Address untuk si client harus pula dilengkapi dengan subnet,  netmask,  dns server,   gateway,   broadcast

Edit file dhcpd.conf dengan perintah:
D4V1D:~# nano /etc/dhcp3/dhcpd.conf

Contoh konfigurasi DHCP yang saya buat, sesuai dengan IP yang telah kita setting pada pembuatan Router sebagai berikut.

# A slightly different configuration for an internal subnet.
  subnet 192.168.1.0 netmask 255.255.255.192 {
  range 192.168.1.10 192.168.1.20;
  option domain-name-servers 172.16.16.1;
  option domain-name "bloganakkomputer.com";
  option routers 192.168.1.1;
  option broadcast-address 192.168.1.63;
  default-lease-time 600;
  max-lease-time 7200;
}


Screenshoot dhcpd.conf

Jangan lupa lakukan proses restart terhadap service setiap kali kita melakukan perubahan pada
file konfigurasi:
D4V1D:~# /etc/init.d/dhcp3-server restart

3. Pengujian

Pengujian di Client
Untuk melakukan pengujian di sisi client, beberapa hal harus dilakukan diantaranya:
1.  Pastikan server dan client saling terkoneksi
2 . Lakukan proses pengaturan di sisi client bahwa settip IP Address di lakukan secara automatic.

1. Ikuti langkah-langkah berikut untuk melakukan setting di sisi client:
    Klik menu start - Control Panel
    Pilih Network Connection
    Pilih Local Area Network - klik kanan mouse - pilih Properties
    Pilih Internet Protocol (TCP/IP) - Pilih Properties
    Pilih opsi Obtain an IP address automatically
    Pilih opsi Obtain DNS server address automatically - tekan tombol OK


2. Setelah langkah diatas dilakukan, kita harus melakukan pengujian terhadap layanan service DHCP dari server. Ikuti langkah berikut:
     (a) Klik menu start - run ketik "cmd" . Maka akan muncul halaman dos prompt
     (b) Pada halaman Dos prompt tersebut lakukan perintah ipconf ig /release, pastikan bahwa IP address 
            dari interface berubah menjadi 0.0.0.0
     (c) Masih pada halaman yang sama ketikkan perintah ipconf ig /renew untuk memperoleh IP Address 
           dari server.
     (d) Bila tidak terjadi kesalahan seharusnya client sudah mendapat IP Address dari server.

Perhatikan gambar berikut yang membuktikan bahwa DHCP Server telah bekerja dan client memperoleh IP Address dari server.


Jika kita lihat Propertiesnya akan terlihat sebagai berikut.


Lalu coba kita ping gatewaynya..


Jika hingga langkah ini kita telah mendapat IP dari server dan ping gateway lancar berarti DHCP Server yang kita buat telah dapat berjalan dengan baik.
Sekian tutorial tentang DHCP server dan selamat mencoba.
D4V1D

Friday, February 4, 2011

Konfigurasi Virtual Host di Debian Lenny (Web Server_2)


Untuk sesi kali ini, saya ingin berbagi konfigurasi Virtual Host yang merupakan lanjutan dari Web Server. Namun sebelumnya saya anggap dahulu bahwa Web Server, Mail Server dan DNS Server yang akan kita buat virtual host sudah terinstall dan dikonfigurasi serta dapat berjalan dengan lancar.
Ok, langsung saja untuk konfigurasi Virtual Host ikuti langkah2 berikut.
1. Konfigurasi

·         Edit apache2
D4V1D:~# nano /etc/apache2/sites-available/default
·         Ubah dan tambahkan dengan domain yang kita buat pada bagian paling bawah. Karena saya akan membuat www.bloganakkomputer.com, mail.bloganakkomputer.com, download.bloganakkomputer.com maka konfigurasinya akan menjadi:


·         Buat juga folder untuk subdomain download (sebab saya membuat domain download.bloganakkomputer.com, jika subdomain anda berbeda, tinggal sesuikan saja).
D4V1D:~# mkdir /home/download

·         Restart apache2
D4V1D:~# /etc/init.d/apache2 restart

·         Buat file index untuk www.bloganakkomputer.com (tapi biasanya sudah ada file default untuk www ini)
D4V1D:~# nano /var/www/index.html
Isi script html sesuai yang kita inginkan (dapat juga dengan php script). Contohnya
Welcome

Selamat Datang di Blog Anak Komputer

·         Buat file index juga untuk download.bloganakkomputer.com.
D4V1D:~# nano /var/www/index.html
Isi script html sesuai yang kita inginkan (dapat juga dengan php script). Contohnya
Download

Ini adalah halaman Download Bloganakkomputer
·         Untuk index mail.bloganakkomputer.com tidak perlu dibuat sebab kita hanya mengarahkan saja ke index squirrelmail yang telah kita buat.

2. Pengujian 

Untuk pengujian, akan saya coba dari computer client dengan browser Mozilla Firefox (atau dapat dengan browser yang lain).

> Pertama buka www.bloganakkomputer.com, maka akan keluar:

> Lalu kita buka mail.bloganakkomputer.com dan akan keluar:


> Dan yang terakhir kita buka download.bloganakkomputer.com dan akan keluar:


Jika telah berhasil keluar halaman sesuia yang kita buat, berarti Virtual Host kita telah bekerja dengan baik. Namun jika belum keluar, cek sekali lagi mungkin konfigurasi apache2 atau file index yang kita buat salah tempat.
Sekian.
D4V1D

Membangun Mail Server Berbasis Debian 5 (Lenny)

-->

 E-mail merupakan aplikasi internet yang banyak digunakan saat ini untuk komunikasi dua arah. Selain karena kemudahan dalam penggunaannya juga karen kemurahan teknologi yang ditawarkan oleh email ini. E-mail singkatan dari electronic mail juga dapat dianalogikan dengan pengiriman surat yang umum digunakan saat ini melalui kantor pos, atau melalui jasa pengirim surat atau barang. Pengiriman email dilakukan melalui perangakat elektronik seperti HP/PDA.
Proses pengiriman/penerimaan e-mail melibatkan protokol Simple Mail Transfer Protocol (SMTP) dan Post Office Protocol verson 3 (POP3). Protokol SMTP bertugas untuk mempros-es pengiriman mail (Outgoing mail) dan PHP3 bertugas untuk memproses penerimaan mail (Incoming mail).
Jika user atau pemilik e-mail tidak sedang aktif/off-line untuk mengakses e-mail, maka e-mail yang tertuju kepadanya akan ditampung sementara oleh server e-mail sampai pemilik email tersebut mengaksesnya. Hal ini bisa terjadi karena adanya protokol POP3.
Untuk instalasi kali ini saya asumsikan bahwa DNS server sudah terinstall dengan baik, dan jika ingin melihat konfigurasi DNS server sebelumnya dapat dilihat disini.


Step-By-Step sudah update pada 4-Nov-2012
Langkah-Langkah membuat mail server seperti berikut.
>  Instalasi
Postfix adalah aplikasi yang akan kita installkan untuk membangung sebuah mail server. Untuk melengkapi mail server kita harus menginstallkan software lain yaitu php5, courier-pop, courier-imap, dan Squirrelmail.
a.       Perintahnya
D4V1D:~# apt-get install postfix courier-imap courier-pop php5 squirrelmail
b.      Maka akan keluar pilihan Configuring courier-base

Pilih No
c.       Lalu keluar Postfix Configuration, pilih Local Only (sebab kita hanya akan menginstall mail server dalam skala local sebagai uji coba dahulu).


d.      Untuk system mail name masukkan bebas, dan saya pilih mail.bloganakkomputer.com


>  Konfigurasi
a.       Konfigurasi postfix pada file main.cf
D4V1D:~# nano /etc/postfix/main.cf
Tambahkan tanda # pada bagian mydestination dan mailbox_command.
Tambahkan pada baris terakhir
home_mailbox = Maildir/
Sehingga akan menjadi seperti gambar berikut.

Setelah konfigurasi file main.cf seperti di atas, Reconfigure Postfix untuk konfigurasi tambahan (bagian ini sebenarnya bisa di config manual seperti cara di atas, tapi untuk mempermudah saja letak  konfigurasi dan edit post ini, saya tambahkan di bawah step A)


D4V1D:~# dpkg-reconfigure postfix

Dan masukkan dengan ketentuan seperti di bawah ini (sesuaikan dengan kondisi mail server anda):
General Type of Mail Configuration : local only
System Mail Name                   : mail.bloganakkomputer.com
Root and postmaster mail recipient : (leave it blank)
Other destination to accept…       : (leave it as it was, just OK)
Force synchronous updates…         : No
Local Networks                     : 0.0.0.0/0 (add this at the end)
Use Procmail for local delivery    : No
Mailbox size limit (bytes)         : 0
Local address extension character  : +
Internet protocols to use          : ipv4

Restart service
D4V1D:~# /etc/init.d/postfix restart
D4V1D:~# /etc/init.d/courier-imap restart


b.      Kemudian masuk direktori skel dan buat direktori Maildir
D4V1D:~# cd /etc/skel/
D4V1D:/etc/skel# maildirmake Maildir 

c.       Konfigurasi squirrelmail
Buat konfigurasi untuk squirrelmail.
D4V1D:~# squirrelmail-configure
Kemudian akan muncul
Masukkan command
Command >> d
Lalu ketik courier
Command >> courier
Lalu akan keluar konfigurasi
imap_server_type = courier
default_folder_prefix = INBOX.
trash_folder = Trash
sent_folder = Sent
draft_folder = Drafts
show_prefix_option = false
default_sub_of_inbox = false
show_contain_subfolders_option = false
optional_delimiter = .
delete_folder = true

Press any key to continue...
Tekan enter
Save data
Command >> s
Lalu Quit
Command >> q

d.      Buat Virtualhost squirrelmail dengan cara edit /etc/apache2/apache2.conf
D4V1D:~# nano /etc/apache2/apache2.conf
Pada baris terakhir tambahkan,
Include /etc/squirrelmail/apache.conf
Sehingga menjadi 


e.       Restart Apache
D4V1D:~# /etc/init.d/apache2 restart

>  Pengujian
A.    Dari computer server
D4V1D:~# lynx bloganakkomputer/squirrelmail
Sehingga akan keluar

Untuk uji coba apakah mail server sudah dapat berjalan dengan benar, kita perlu login, maka kita akan membuat user dahulu dari server dengan perintah
D4V1D:~# adduser angela

Adding user `angela' ...
Adding new group `angela' (1003) ...
Adding new user `angela' (1003) with group `angela' ...
Creating home directory `/home/angela' ...
Copying files from `/etc/skel' ...
Enter new UNIX password:
Retype new UNIX password:
passwd: password updated successfully
Changing the user information for angela
Enter the new value, or press ENTER for the default
        Full Name []:
        Room Number []:
        Work Phone []:
        Home Phone []:
        Other []:
Is the information correct? [Y/n] y

Untuk melakukan test konfigurasi mail server pada local mesin (server) ikuti langkah-langkah
di bawah ini :
·         Masuk ke localmesin

D4V1D:~# telnet localhost 25

Trying 127.0.0.1...
Connected to localhost.
Escape character is '^]'.
220 bloganakkomputer.com ESMTP Postfix (Debian/GNU)
·         kemudian ketikan perintah di bawah ini
Anda : ehlo virtual.test
250-bloganakkomputer.com
250-PIPELINING
250-SIZE 10240000
250-VRFY
250-ETRN
250-STARTTLS
250-ENHANCEDSTATUSCODES
250-8BITMIME
250 DSN

Anda: mail from:angela@bloganakkomputer.com
Server: 250 2.1.0 Ok

Anda: rcpt to:david@bloganakkomputer.com
Server: 250 2.1.5 Ok

Anda: data
Server: 354 End data with .

Anda: Subject:mencoba kirim email
Hai,...
Namaku Angela
. (tanda titik)
Server: 250 2.0.0 Ok: queued as 17B2F503BA

Anda: quit
Server: 221 2.0.0 Bye

Screenshoot Langkah Telnet

Langkah di atas merupakan langkah untuk mengirim email ke david@bloganakkomputer.com yang merupakan user default (saat instalasi) dengan user angela@bloganakkomputer.com yang merupakan user kedua dengan program telnet.
Apakah email di atas telah terkirim ke user david? Mari kita cek dari computer client.

B.     Dari computer client
Dari computer client dengan browser, buka http://bloganakkomputer.com/squirrelmail
Masukkan username dan passwordnya, enter.
Buka Inbox dan cek Inbox.
Coba kita buka.
Lalu coba balas, dengan memilih reply.
Kemudian logout dan login dengan user angela.
Cek Inboxnya, bila sudah terkirim, maka mail server yang kita bangun telah berhasil.
Sampai langkah ini, bila proses mengirim (baik dari telnet maupun dari browser internet client) dan menerima telah berhasil, maka dapat kita pastikan mail server telah dapat berjalan lancar.
Namun sebenarnya ada yang masih kurang dengan alamat domainnya. Kita harus memasukkan alamat http://bloganakkomputer.com/squirrelmail untuk dapat mengaksesnya. Bagaimana caranya, supaya untuk dapat mengaksesnya dengan alamat http://mail.bloganakkomputer.com/ ?
Akan saya bahas di bagian berikutnya pada bagian Virtual Host.

Bila masih ada yang kesulitan, bisa comment di bawah, dan sertakan email anda untuk balasan..
Sekian.
D4V1D